
How To Take a Screenshot on Chromebook will be explained in this article. Chromebooks are great for everyday users because they have the majority of the essential features, and you may purchase a number of high-quality Chromebooks. With a set of shortcut keys, you can quickly take a screenshot on a Chromebook that you recently purchased.
With Chrome OS’s Screen Capture function, you may take whatever type of screenshot you want, including full-screen, window, and partial images, without installing any additional software.
How To Take a Screenshot on Chromebook In 2022
In this article, you can know about How To Take a Screenshot on Chromebook here are the details below;
In addition, I’ve included a link to a third-party app in case you’re seeking for a programme with annotation and screen recording capabilities.
Having stated that, let’s move on to 2022 and learn how to screenshot on a Chromebook.
We’ve covered eight different ways to screenshot a Chromebook in this post, including full-screen, partial, and window screenshots.
Any Chromebook, including those made by Lenovo, HP, Asus, Acer, and others, can be used with the technique described below.
To find the pertinent part, look at the table below.
Check out some great Chrome OS tips and techniques as well if you want to develop your skills with Chromebooks.
1. Full-screen Screenshot on Chromebooks: Ctrl + Overview key
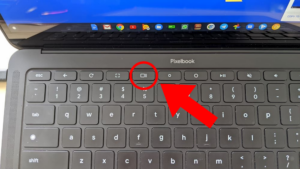
The simplest way to rapidly snap a screenshot on a Chromebook is to simultaneously hit the Overview and Ctrl keys.
Above the “6” key is the overview button.
How to Take a Chromebook Screenshot
A fullscreen screenshot will be taken right away, and it will be saved in the “Downloads” folder of the Files app.
You may find the screenshot in this folder by just opening the Files app.
How to Take a Chromebook Screenshot
Apart from that, a pop-up appears in the bottom-right corner of the screen whenever you capture a screenshot.
The screenshot can also be annotated by clicking “Edit” from that point on.
Additionally, you get access to the usual photo-editing tools, including filters, cropping, resizing, and more. Also check How To Make Folders In Iphone
You may paste a screenshot immediately into your preferred photo editor for a Chromebook, Gmail, or any other media field because screenshots on Chrome OS are instantly copied to your clipboard.
For instance, I can utilise the Chromebook keyboard shortcuts “Ctrl + V” in the Gmail Compose window, and the screenshot has been posted.
Additionally, if you enable the Chromebook’s clipboard history capability, you may use a Chrome OS keyboard shortcut to locate previously copied texts, screenshots, and other items.
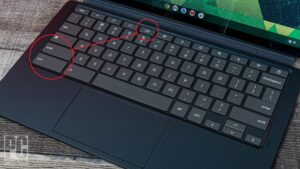
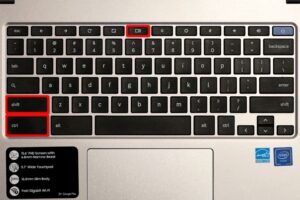
2. Active Window Screenshot on Chromebooks: Ctrl + Alt + Overview key

Press Ctrl, Alt, and the Overview button together to screenshot a Chromebook and take a screenshot of the currently open window.
You can either click on the window with your mouse or press Enter to copy the active window.
3. Partial Screenshot on Chromebooks: Ctrl + Shift + Overview key
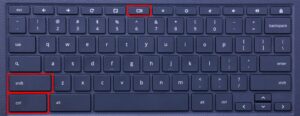
Press Ctrl, Shift, and the Overview button on your Chromebook to capture a free screenshot of a selected region.
You may choose the ideal region to screenshot on your Chromebook as the screen will dim.
I personally adore this shortcut and consistently use it on my Chromebook to take a screenshot. Also check content monetization
Chromebook screenshot taken using Screen Capture
While many people prefer using the keyboard keys to rapidly take screenshots, Chrome OS has made things simpler for you if you just want a straightforward button.
You can now snap a screenshot on your Chromebook from the Quick Settings menu thanks to Google’s addition of the Screen Capture feature to Chrome OS.
On top of that, Screen Capture on a Chromebook allows you to record the screen.
- You must first update to the newest Chrome OS version.
This functionality will be turned on by default on your Chromebook if you are using Chrome OS version 89 or higher.
Additionally, the feature is accessible through all channels, including Dev, Beta, and Stable.
- Next, select “Screen capture” from the Quick Settings menu in the lower right corner of the screen.
- Screenshot on a Chromebook: How to
A tool bar will appear after you click on it.
You may now decide whether you want a full-screen, window, or partial screenshot.
Ensure that “Camera” and not the video indicator is chosen in the tool bar.
As an illustration, I’m utilising this screen capture option to grab a portion of a screenshot.
In the Downloads folder, the screen capture will be saved.
- Screenshot on a Chromebook:
On your Chromebook, click the “cogwheel” symbol at the bottom and select “Select Folder” if you wish to modify the default screenshot folder.
Using Screen Capture 5 on a Chromebook, take a screenshot.
Select the folder where you expect to keep the screen captures from here.
For all of my screencaps, for instance, I’ve made a “Screenshot” folder under “Downloads.”
Using Screen Capture 6 on a Chromebook, take a screenshot.
All of your Chromebook screenshots will now be saved in the folder you just chose.
Take Screenshots with Buttons in Tablet Mode
Press the power and one of the volume buttons simultaneously to take a screenshot on a Chromebook while it is in tablet or tent mode, just like you would on a smartphone.
Simply press and release the buttons all at once; there is no need to press and hold.
Your Chrome OS tablet will instantly take a fullscreen screenshot.
The shortcuts listed below provide detailed instructions on how to take a screenshot on an HP Chromebook while it is in tablet mode.
Power + one of the Volume buttons as a shortcut
How to Take a Chromebook Screenshot
Capture Screenshots on Chromebook with a Stylus.
- Full-Screen Screenshot:The bottom-right shelf will display a “Stylus” menu if your Chromebook is equipped with a stylus.
On your Chromebook, open it and choose “Capture Screen” to take a screenshot of the entire page.
The best way to screenshot on an Acer Chromebook with a stylus is to use this method.
- Partial Screenshot: Click on the “Stylus” menu and choose “Capture Region” to take a partial screenshot.
To select an area, use your stylus or touch and hold a location on the screen while dragging.
Release the stylus after that, and a screenshot will be taken and saved to the folder you’ve chosen.
Take Screenshots on Chromebook with Chrome Extensions
We now know how to natively take a screenshot on a Chromebook.
Check out the Nimbus extension if you’re looking for a more flexible and potent screenshot tool for your device (Free).
It offers screen recording, on-screen annotation, and all kinds of screenshot capabilities.
1. Full-page Screenshot: Ctrl + F5.
If your Chromebook is equipped with an external keyboard, simultaneously pressing Ctrl and F5.
It functions similarly to the native Chromebook shortcut, but instead of pressing the overview button, you must press F5.
2. Window Screenshot: Ctrl + Alt + F5
Press Ctrl + Alt + F5 to take a screenshot of a window using an external keyboard.
Your Chromebook’s active window will be quickly captured in a screenshot.
3. Partial Screenshot: Ctrl + Shift + F5
To take a partial screenshot with an external keyboard, press Ctrl + Shift + F5.
You can choose a region with ease and the screen will automatically dim.
Question and Answer Sheets
The location of screenshots on a Chromebook.
Chromebooks store all screenshots in the “Downloads” folder.
To access it, simply open the “Files” app and navigate to the “Downloads” folder.
The Settings -> Advanced -> Downloads -> Change screenshot item allows you to modify the location where screenshots are saved.
How does F5 work on a Chromebook?
Simply put, the overview key (F5) on a Chromebook is typically found above the 6 key.
To take a screenshot, press it as well as Ctrl.
On a Chromebook, what does the Switch Key do?
Once more, the overview key and the Switch key are identical.
On a Chromebook, it is known as the Switch key because it is used to switch between windows.
Screenshot Like a Pro on a Chromebook
So that’s how you screenshot on a Chromebook, according to our guide.
All the most effective screenshot-taking techniques, including both built-in and external extensions, have been covered.
While I find the built-in shortcuts to be adequate, some users prefer a comprehensive solution that includes everything from annotation to free-style crop selection.
Choose the aforementioned third-party app in that situation.
On your Chromebook, you can enable the Caps Lock key if there isn’t a dedicated Caps Lock key nearby.
In the remarks section below, please ask any questions you may have.